Springmvc 基础配置

Springmvc 基础配置

大神请绕道。

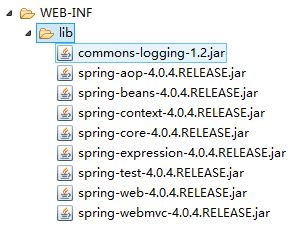
不涉及到数据库的事务,或整合其他的框架,只需要几个基础包就可以了。如下图:

第一个配置方法:

springmvc.xml 文件

<?xml version="1.0" encoding="UTF-8"?>
<beans xmlns="http://www.springframework.org/schema/beans"
xmlns:xsi="http://www.w3.org/2001/XMLSchema-instance"
xmlns:context="http://www.springframework.org/schema/context"
xmlns:mvc="http://www.springframework.org/schema/mvc"
xsi:schemaLocation="http://www.springframework.org/schema/beans http://www.springframework.org/schema/beans/spring-beans.xsd
http://www.springframework.org/schema/context http://www.springframework.org/schema/context/spring-context-4.0.xsd
http://www.springframework.org/schema/mvc http://www.springframework.org/schema/mvc/spring-mvc-4.0.xsd">

<mvc:annotation-driven/>
<mvc:default-servlet-handler/>
<!-- 配置自定扫描的包 -->
<context:component-scan base-package="top.lrshuai.springmvc"></context:component-scan>

<!-- 配置视图解析器: 如何把 handler 方法返回值解析为实际的物理视图 -->
<bean class="org.springframework.web.servlet.view.InternalResourceViewResolver">
<property name="prefix" value="/WEB-INF/jsp/"></property>
<property name="suffix" value=".jsp"></property>
</bean>

</beans>

注意的是springmvc.xml 文件要放在WEB-INF 下。不然会报文件找不到。

web.xml 文件

<?xml version="1.0" encoding="UTF-8"?>
<web-app xmlns:xsi="http://www.w3.org/2001/XMLSchema-instance"
xmlns="http://java.sun.com/xml/ns/javaee"
xsi:schemaLocation="http://java.sun.com/xml/ns/javaee http://java.sun.com/xml/ns/javaee/web-app_2_5.xsd"
id="WebApp_ID" version="2.5">

<!-- 配置 SpringMVC -->
<servlet>
<servlet-name>springmvc</servlet-name>
<servlet-class>org.springframework.web.servlet.DispatcherServlet</servlet-class>
<!-- 配置 DispatcherServlet 的一个初始化参数: 配置 SpringMVC 配置文件的位置和名称 -->
<!--
实际上也可以不通过 contextConfigLocation 来配置 SpringMVC 的配置文件, 而使用默认的.
默认的配置文件为: /WEB-INF/<servlet-name>-servlet.xml
-->
<!--
<init-param>
<param-name>contextConfigLocation</param-name>
<param-value>classpath:springmvc.xml</param-value>
</init-param>
-->
<load-on-startup>1</load-on-startup>
</servlet>

<servlet-mapping>
<servlet-name>springmvc</servlet-name>
<url-pattern>/</url-pattern>
</servlet-mapping>

</web-app>

第二个配置方法:

springmvc.xml 可以不放在WEB-INF 下面,放在src目录下的话要修改web.xml文件,修改如下:

web.xml

<?xml version="1.0" encoding="UTF-8"?>
<web-app xmlns:xsi="http://www.w3.org/2001/XMLSchema-instance" xmlns="http://xmlns.jcp.org/xml/ns/javaee" xsi:schemaLocation="http://xmlns.jcp.org/xml/ns/javaee http://xmlns.jcp.org/xml/ns/javaee/web-app_3_1.xsd" id="WebApp_ID" version="3.1">
<display-name>gdinterface</display-name>
<welcome-file-list>
<welcome-file>index.html</welcome-file>
</welcome-file-list>

<servlet>
<servlet-name>springMvc</servlet-name>
<servlet-class>org.springframework.web.servlet.DispatcherServlet</servlet-class>
<init-param>
<param-name>contextConfigLocation</param-name>
<!-- 修改的地方在这 -->
<param-value>classpath:springmvc.xml</param-value>
</init-param>
<load-on-startup>1</load-on-startup>
</servlet>
<servlet-mapping>
<servlet-name>springMvc</servlet-name>
<url-pattern>/</url-pattern>
</servlet-mapping>

<error-page>
<error-code>404</error-code>
<location>/404.jsp</location>
</error-page>

<error-page>
<error-code>500</error-code>
<location>/500.jsp</location>
</error-page>
</web-app>

第三种配置方法:

如果要整合其他的框架,一般是分为两个配置文件的。需要注意的是,扫描包的时候可能会导致bean被创建了两次。所有可以使用 exclude-filter 和 include-filter 子节点来规定只能扫描的注解。

springmvc.xml

<?xml version="1.0" encoding="UTF-8"?>
<beans xmlns="http://www.springframework.org/schema/beans"
xmlns:xsi="http://www.w3.org/2001/XMLSchema-instance"
xmlns:context="http://www.springframework.org/schema/context"
xmlns:mvc="http://www.springframework.org/schema/mvc"
xsi:schemaLocation="http://www.springframework.org/schema/beans http://www.springframework.org/schema/beans/spring-beans.xsd
http://www.springframework.org/schema/context http://www.springframework.org/schema/context/spring-context-4.0.xsd
http://www.springframework.org/schema/mvc http://www.springframework.org/schema/mvc/spring-mvc-4.0.xsd">

<mvc:annotation-driven/>
<mvc:default-servlet-handler/>
<!-- 配置自定扫描的包 -->
<context:component-scan base-package="top.lrshuai.springmvc" use-default-filters="false">
<context:include-filter type="annotation"
expression="org.springframework.stereotype.Controller"/>
<context:include-filter type="annotation"
expression="org.springframework.web.bind.annotation.ControllerAdvice"/>
</context:component-scan>

<!-- 配置视图解析器: 如何把 handler 方法返回值解析为实际的物理视图 -->
<bean class="org.springframework.web.servlet.view.InternalResourceViewResolver">
<property name="prefix" value="/WEB-INF/jsp/"></property>
<property name="suffix" value=".jsp"></property>
</bean>

</beans>

整合其他框架的配置文件,就把它叫做 bean.xml,内容如下:

bean.xml

<?xml version="1.0" encoding="UTF-8"?>
<beans xmlns="http://www.springframework.org/schema/beans"
xmlns:xsi="http://www.w3.org/2001/XMLSchema-instance"
xmlns:context="http://www.springframework.org/schema/context"
xsi:schemaLocation="http://www.springframework.org/schema/beans http://www.springframework.org/schema/beans/spring-beans.xsd
http://www.springframework.org/schema/context http://www.springframework.org/schema/context/spring-context-4.0.xsd">

<context:component-scan base-package="top.lrshuai.springmvc">
<context:exclude-filter type="annotation"
expression="org.springframework.stereotype.Controller"/>
<context:exclude-filter type="annotation"
expression="org.springframework.web.bind.annotation.ControllerAdvice"/>
</context:component-scan>

<!-- 配置数据源, 整合其他框架, 事务等. -->

</beans>

web.xml 要修改

<?xml version="1.0" encoding="UTF-8"?>
<web-app xmlns:xsi="http://www.w3.org/2001/XMLSchema-instance"
xmlns="http://java.sun.com/xml/ns/javaee"
xsi:schemaLocation="http://java.sun.com/xml/ns/javaee http://java.sun.com/xml/ns/javaee/web-app_2_5.xsd"
id="WebApp_ID" version="2.5">

<!-- 配置启动 Spring IOC 容器的 Listener -->
<!-- needed for ContextLoaderListener -->
<context-param>
<param-name>contextConfigLocation</param-name>
<param-value>classpath:beans.xml</param-value>
</context-param>

<!-- Bootstraps the root web application context before servlet initialization -->
<listener>
<listener-class>org.springframework.web.context.ContextLoaderListener</listener-class>
</listener>

<servlet>
<servlet-name>Springmvc</servlet-name>
<servlet-class>org.springframework.web.servlet.DispatcherServlet</servlet-class>
<init-param>
<param-name>contextConfigLocation</param-name>
<param-value>classpath:springmvc.xml</param-value>
</init-param>
<load-on-startup>1</load-on-startup>
</servlet>

<servlet-mapping>
<servlet-name>Springmvc</servlet-name>
<url-pattern>/</url-pattern>
</servlet-mapping>

</web-app>

需要注意的是 springmvc.xml 和 bean.xml 要放在src目录下

-------------本文结束 感谢您的阅读-------------